Warmup Project
Project Overview
Your goal in this project will be to program the Neato to execute a number of behaviors. In the process of implementing these behaviors, you will also learn about tools and strategies for debugging robot programs. You are encouraged to be as creative as possible in this assignment. If you want to substitute another behavior for one of the following, just let us know! For each of these behaviors, there is a straightforward way to implement the behavior and a more sophisticated way. See the going beyond section for some more information on these more sophisticated approaches. You should be spending about fifteen hours on this assignment, so if you find yourself breezing through the required portions, we recommend that you push yourself a bit further! The flip side is that if you find that you are stuck or having a difficult time making progress, please annotate this document (as long as you are viewing this through Canvas), post a note on the
Learning Goals
- Gain familiarity with ROS
- Brush up on Python
- Learn strategies for debugging robotics programs
- Learn about processing data from the laser range finder and bump sensors
- Learn to program robot behaviors using reactive control strategies
- Learn about finite-state robot control
Project Showcase
If you want to show off something you did, add it to
Logistics
You may work on this assignment with one other person from the class. You will be turning in your project (both code + writeup) via Github. To help us track your assignment, please fork
We have included several extensions to the basic project that we hope will keep students that are coming in with more background knowledge (whether that be robotics knowledge or programming knowledge) engaged.
You may find the resources page useful for completing this assignment.
Intermediate checkpoint
Halfway through the project you should have the following parts of the project done.
- Simple visualizations using rviz
- Test drive bag file
- Teleop
- Drive square
- Wall following
- A preliminary writeup of your wall follower
Code Structure
Your code should be placed in a ROS package called warmup_project. If you want to structure your code with more than one package, make sure to document the additional packages in your project writeup. If you are unsure how to create a ROS package, consult the ROS tutorial on creating a catkin package.
Here are the files you will likely generate as part of this assignment.
warmup_project/bags/drive_square_demo.bag
warmup_project/bags/finite_state_controller_demo.bag
warmup_project/bags/obstacle_avoider_demo.bag
warmup_project/bags/person_follower_demo.bag
warmup_project/bags/test_drive.bag
warmup_project/bags/wall_follower_demo.bag
warmup_project/scripts/teleop.py
warmup_project/scripts/drive_square.py
warmup_project/scripts/obstacle_avoider.py
warmup_project/scripts/finite_state_controller.py
warmup_project/scripts/person_follower.py
warmup_project/scripts/wall_follower.py
warmup_project/README.md
In your github repository, create a markdown file called README.md to serve as documentation for your project. Your writeup should answer the following questions. We expect this writeup to be done in such a way that you are proud to include it as part of your professional portfolio. As such, please make sure to write the report so that it is understandable to an external audience. Make sure to add pictures to your report, links to Youtube videos, embedded animated Gifs (these can be recorded with the tool peek).
- For each behavior, describe the problem at a high-level. Include any relevant diagrams that help explain your approach. Discuss your strategy at a high-level and include any tricky decisions that had to be made to realize a successful implementation.
- For the finite state controller, what was the overall behavior. What were the states? What did the robot do in each state? How did you combine and how did you detect when to transition between behaviors? Consider including a state transition diagram in your writeup.
- How was your code structured? Make sure to include a sufficient detail about the object-oriented structure you used for your project.
- What if any challenges did you face along the way?
- What would you do to improve your project if you had more time?
- What are the key takeaways from this assignment for future robotic programming projects? For each takeaway, provide a sentence or two of elaboration.
Note: don’t leave the writeup to the very end! You will have a much better time if you document as you go. The simple act of writing up your work will actually help generate new ideas and improve the organization for your robot programs.
Sample Writeups
Here are some writeups that are particularly solid. We hope that these might get you excited about putting in the effort to document your work.
-
Matthew Beaudouin-Lafon and Katya Soltan -
Mary Keenan -
Cedric Kim -
Jamie Cho does a great job documenting his work. Some of the approaches he uses are very advanced (due to prior robotics experience that he had before taking the course).
Robot Simulation
We will be using the Gazebo simulator for much of this course. For the warmup project we will be using a simulation of a robotic vacuum cleaner from Neato Robotics.
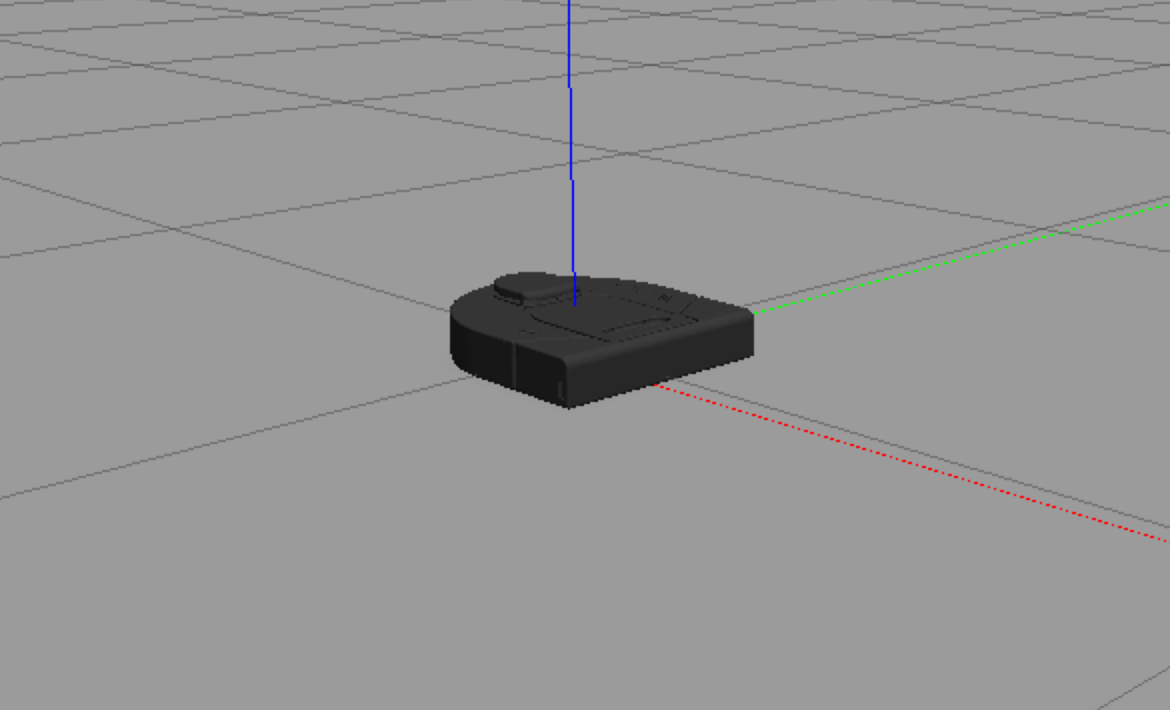
The documentation on how to run the simulator, as well as the various topics (e.g., for accessing sensor data or sending motor commands), are documented on our
Robot Debugging Tools
RViz
Probably the most important tool for debugging in this class will be rviz. You can think of rviz as a specially tuned debugger for robots. Consider the case of debugging a typical program by instrumenting your program with print statements. These print statements may give you useful information as to the state (e.g. values of variables) of your program and, ultimately, help you find errors in your code. This approach becomes infeasible when you work on robots with high bandwidth sensors (like the Neato). The Neato sensory data consists of hundreds of thousands of numbers generated each second. Visualizing all these numbers using print statements is infeasible.
Rviz contains visualization tools for common sensory data. Further, there are some general purpose visualization messages that you can customize for your purposes. In this portion of the assignment, you will get familiar with using rviz with the Neato, and write a simple program to visualize arbitrary geometric shapes.
Part 1
For part 1 you will be using rviz to visualize the data from the simulated Neatos. Start the Neato simulator. Read through the documentation for rviz and perform the following steps:
- Set the
fixed_frametoodom - Add a visualization of the Neato’s laser scan (topic /scan). This is most easily found by using the “By topic” tab. Make sure to adjust the size of the markers so you can see them).
- Add a visualization of the Neato itself (this can be done by selecting “Robot Model” from the insert menu”)
- If you start the simulator with the
load_camera:=trueoption, you can also add a visualization of the Neato’s camera feed (topic camera/image_raw).
Save your rviz configuration so you can use it later (you can simply make it the default configuration by overwriting default.rviz or save it as a different file if you want to maintain the current default rviz behavior).
You do not have to turn in anything for this part.
Part 2
Write a ROS node that, 10 times a second, publishes a message of type visualization_msgs/Marker. The marker message you publish should specify to rviz to create a sphere at position x=1m and y=2m in the Neato’s odometry coordinate system (odom). It is up to you how large and what color to make the sphere. Information on the visualization_msgs/Marker message can be found here (unfortunately the official document only has C++ code as an example. We have ported the example to Python). Place your screenshot in a subdirectory called screenshots. Try changing the coordinate frame for your sphere to base_link. How does the behavior of the visualization change? Try changing the coordinate frame for your sphere to a different coordinate system (e.g., wheel_left_link). How does the behavior of the visualization change?
You do not have to turn in anything for this part.
rosbag
Rosbag is a very useful tool for debugging robot programs. The basic idea is to record all of the data from a particular run of the robot (laser scans, bump sensors, images, etc.), and then use this recording to help test and debug your code. For instance, suppose you are writing code to estimate the positions of walls in an environment. Given a recording of your robot moving around in an environment, you can iterate on your wall detection system until it works on this recorded test case without ever having to go back and interface with the physical (or simulated) robot! These recorded test cases are thus very useful for increasing the time efficiency and repeatability of your debugging process.
Create a bag file of you driving the Neato around. You can do this by using the rosbag record command. Be careful not to record the /camera/image_raw topic or the topics under /gazebo/ (as they will make your bag file get large very fast). In order to avoid recording these high data rate topics, you can use the following command (don’t worry as this command won’t exclude any necessary topics from the bag file).
$ rosbag record -j -a -x ".*image_raw$|/gazebo/.*" -o bag-file-name
Note: these instructions result in an almost 50x reduction in file size when compared to the previous instructions!
Where bag-file-name is where you’d like to store the recorded messages (rosbag will add a time stamp to your bag file name automatically).
Once you have recorded your bag file, play it back and visualize the results in rviz. Make sure to disconnect from the robot before playing back your bag file! Be very careful about the system clock when using rosbag. You want ROS to use the time stamps as they were recorded in the bag file, so be sure to specify the –clock argument when playing back your bagfile.
$ rosbag play --clock path-to-bag-file
If you you are not able to view the visual of the robot through rviz, or rviz shows ROS time as being the same as wall time (instead of the time in the bag file), try running the following command, and then restarting rviz.
$ roslaunch neato_gazebo prep_for_bag.launch
Please push your, hopefully not too large, bag file to your repo in a subdirectory called bags. If the bag file is more than 50 megabytes or so, something is likely wrong (e.g., you captured the uncompressed images on mistake). For our convenience please name the bag something that allows us to determine which part it corresponds to (you will be generating more bag files later).
Neato Programming
Robot Teleop
While you are given a teleoperation program (teleop_twist_keyboard), here, you will be writing your own code to teleoperate the robot. If you get really ambitious you can try using a gamepad or the mouse.
Non-blocking keyboard input is surprisingly hard to do. To help, here is a skeleton program for getting the next key pressed when the focus is on the window where your program is running. The cryptic code ‘\x03’ refers to control-c (which will exit the program).
import tty
import select
import sys
import termios

def getKey():
    tty.setraw(sys.stdin.fileno())
    select.select([sys.stdin], [], [], 0)
    key = sys.stdin.read(1)
    termios.tcsetattr(sys.stdin, termios.TCSADRAIN, settings)
    return key

settings = termios.tcgetattr(sys.stdin)
key = None

while key != '\x03':
    key = getKey()
    print(key)
Put your teleop code in a scripts subdirectory of your warmup_project package. For consistency, please put your code in a file named teleop.py. Make sure your python script is executable by running $ chmod u+x on it.
Driving in a Square
Write a ROS Node to move the Neato through a 1m by 1m square path. You can solve this using either timing (e.g., turn at a fixe speed for a period of time) or using the Neato’s onboard odometry. We’ll leave it to you which one to try (using timing is significantly easier). Put your code in the scripts subdirectory in a file called drive_square.py.
Recording
Using the rosbag instructions from earlier, record a demo of your square driving code in action. Push your bag file to your repo in the bags subdirectory (again, use a suitable name so that we can tell which behavior it corresponds to).
Wall Following
For this behavior your goal will be to pilot the Neato near a wall (e.g. using the teleoperation keyboard node… or just carry it!) and have the Neato move forward while aligning its direction of motion to be parallel to the nearest wall.
To get started let’s draw a simple picture of the situation.
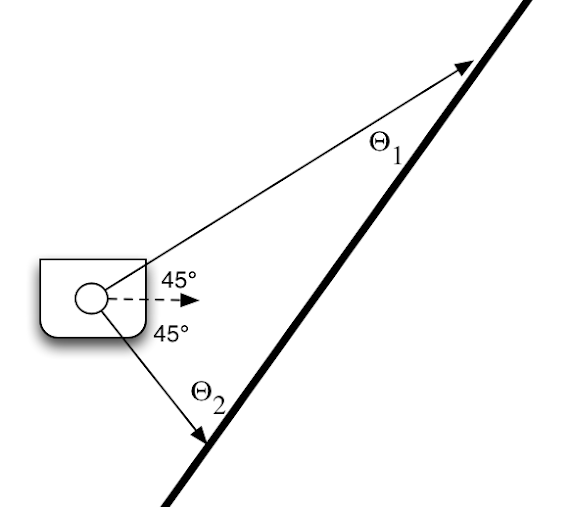
Building upon this simple picture, fill out what you can measure from your robot’s sensors. What is the “goal” of your controller?
Hints
- Draw lots of pictures. Make sure you understand the geometry of the problem.
- A fairly straightforward way to attack the problem is by using proportional control. If you want to do something more sophisticated you may want to look into PID control (see going beyond section).
- Sometimes various laser range measurements might not be present on every scan. In the diagram above we selected two specific laser measurements to make the problem easier, however, you should not limit yourself to just using these measurements. You will probably want to make your code robust by using multiple measurements (for redundancy).
Going beyond (some suggestions, but feel free to be creative)
- Properly incorporate the offset between the laser scanner and the center of rotation of the robot by using the tf module (the TF tutorials are a great place to start).
- Incorporate the bump sensor in some way
- Allow the user to specify a target distance between the robot center and the wall. Your code should follow the wall at the specified distance. You may find a finite state controller to be a useful way to attack this problem (where one state is wall following and the other is adjust distance to wall).
- Handle 90 degree turns gracefully (either by continuing across the gap or following the turn and continuing to do wall following).
- Look into using OpenCV’s Hough Transform or the RANSAC algorithm to do wall detection.
- Use Ben Kuiper’s writeup to make your wall controller critically damped.
Visualization
Whatever method you choose, you must visualize the detected wall using rviz. To do this, publish a message of type visualization_messages/Marker (recall, that the documentation of this message type can be found here). You can publish this message to any topic that you want, but make sure you add it to the visualizations in rviz so you can benefit from your hard work.
Recording
Using the rosbag instructions from earlier, record a demo of your wall follower in action. Make sure that when you record your bag file you are also recording the wall visualization from the previous step. Push your bag file to your repo in the bags subdirectory (again, use a suitable name so that we can tell which behavior it corresponds to).
Person Following
Pretend your Neato is your robot pet and get it to follow you around! The intended behavior is that you can walk in front of the Neato and it will follow your movements while maintaining a specified following distance.
Since we don’t have physical Neatos you can walk in front of, you can use the basic shape models in Gazebo to test out your code. For instance, here is a sample implementation being tested in Gazebo.
Hints
- One way to think about this problem is that the Neato is attempting to keep the closest large object in front of it at a specified distance and immediately in front of the robot.
- As in wall following, you may find proportional control to be a useful strategy.
- There are many ways to figure out where the person is. A simple approach is to calculate the center of mass of the laser measurements that fall within a prescribed box relative to the robot. This diagram should help clear things up:
![]()
Going Beyond
- The center of mass approach fails in a number of cases. One of those is when a large non-person object is within the person tracking region. Can you modify your code to handle this case? One strategy for handling this case is to follow moving objects within the person tracking region.
- Detect the characteristic pattern of two legs follow the centroid defined by only these points.
Visualization
Whatever method you choose, you must visualize the detected person using rviz. To do this, publish a message of type visualization_messages/Marker (recall, that the documentation of this message type can be found here). You can publish this message to any topic that you want, but make sure you add it to the visualizations in rviz so you can benefit from your hard work.
Recording
Using the rosbag instructions from earlier, record a demo of your person follower in action. Make sure that when you record your bag file you are also recording the visualization of the tracked location of the person from the previous step. Push your bag file to your repo in the bags subdirectory (again, use a suitable name so that we can tell which behavior it corresponds to).
Obstacle Avoidance
For this part you should program the Neato to move forward while reactively avoiding obstacles that block its path. A simple approach to the problem is to have the robot turn 90 degrees when it encounters an obstacle, and then turn back toward its preferred direction of motion once the obstacle is gone.
A more advanced approach to the problem is to use the concept of potential fields (see this tutorial, or
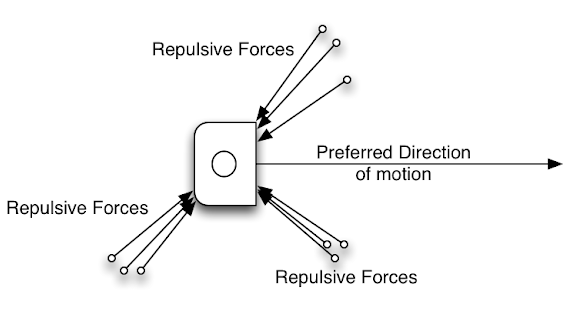
By summing the forces you can obtain a direction of motion for the robot (note: that the sum of forces is not shown in the diagram above). You can then use a proportional controller to steer towards this desired angle while still maintaining forward velocity.
Going beyond
- Instead of always trying to move forward, allow a goal to be specified in the robot’s odometry coordinate frame (called odom). In order to best handle this, you will either want to listen to the
/odomtopic directly or else make use of coordinate transformations via the TF module (again, the TF tutorials are a great place to start).
Visualization
While not required, we recommend that you choose a visualization strategy that helps you as much as possible. Suggestions are to visualize the goal location using a circle, and to visualize the repulsive and attractive potentials using arrows (where the length of the arrow indicates the magnitude of the influence).
Recording
Using the rosbag instructions from earlier, record a demo of your obstacle avoider in action. Push your bag file to your repo in the bags subdirectory (again, use a suitable name so that we can tell which behavior it corresponds to).
Combining Multiple Behaviors Using Finite-State Control
For this part of the assignment you have two choices:
- Combine two or more of your behaviors from earlier to create a finite-state controller.
- Implement a new behavior using finite state control
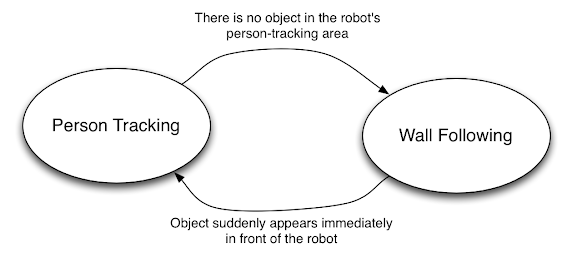
You may find that drawing a state transition diagram is helpful. Each state should indicate either a different behavior or a different stage with a single behavior. Each transition should be some condition that you can reliably detect in the environment. For instance, we might combine wall following with person tracking in the following way:
Visualization
While not required, we recommend that you choose a visualization strategy that helps you as much as possible.
Recording
Using the rosbag instructions from earlier, record a demo of your finite-state controller in action. Push your bag file to your repo in the bags subdirectory (again, use a suitable name so that we can tell which behavior it corresponds to).
Tips, Tricks, and Words of (Pseudo?) Wisdom
- We want to create an environment in this course where folks contribute interesting things they’ve learned to the rest of the class. To accomplish this, we’ve created
a Google doc that we can use for collecting useful tips for this assignment . We’ve already prepopulated the document with useful information on calculating angle differences; converting a ROS pose to x, y, and yaw; and project a laser scan into the odometry frame. - When programming robots you have to get used to the idea that your code is never “bug free” in the same way that an implementation of a sorting algorithm can be bug free (there is always more work to do to make your robot code more robust to various scenarios).
- When your robot is not doing what you expect it to, you are often faced with the decision of spending time tweaking your code to get it to work or spending time writing code to visualize / understand what your code is doing. Students often are comfortable with the former (tweaking) and hesitant to pursue the latter (visualizing). We advise you to push yourself to work on visualization and other means to understand what your code is doing. You will find that for robotics programming, these visualizations will prove invaluable for rooting out bugs and finding ways to improve your code.