Writing our first sensory-motor loop
Today
- Discussion:
robots and liability - Writing our first sensory-motor loops (in groups)
For Next Time
- Read
this paper for historical context on reactive robotic control strategies - Work on the
the Warmup Project
Discussion: Who is to blame when robots cause harm?
Links to the
Sensory Motor Loops
Thinking back to the first day of class, one way to think of the intelligence that drives a robot is as a sensory-motor loop.
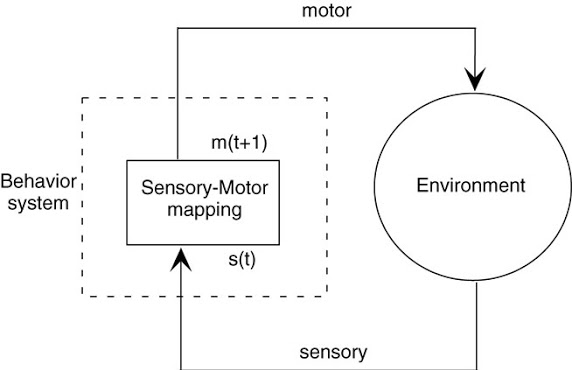
Today, we will kick off a week long project to investigate how we can create sensory-motor loops that can realize intelligent behavior on a robot. Please push yourself to use object-oriented programming techniques as you go through these examples. Today in class is a great time to debug some of your understanding of these topics if you are having trouble.
Creating our First Sensory Motor Loop
Sample solutions to this can be found in the
comprobo20Github repository underin_class_day_03_sample . If you don’t see it in your fork, make sure to do a$ git pull upstream master
Find another person in the class to work with. In pairs, you will begin to explore the idea of a sensory-motor loop on the Neatos.
In order to get started, create a package for the code that you will be writing today. As with all ROS packages in your workspace, it must be inside of your catkin_ws/src folder. Besides this requirement, you are free to put the package anywhere, however, I recommend that put it in the root directory of your comprobo20 repository.
$ cd ~/catkin_ws/src/comprobo20
$ catkin_create_pkg in_class_day03 rospy std_msgs geometry_msgs neato_node sensor_msgs
The first sensory-motor loop we will create is one in which the robot moves forward at a fixed speed until it senses an obstacle (using the bump sensor) and then stops. For a rundown of the bump sensors on the Neato, check out the
Hints:
- You will need some way to share data between the callback functions that process the Neato’s sensory data and your main robot program. The best way to do this is to use a Python class, but if you are not familiar with these (we will get exposure to them soon), you can use global variables.
Call your node something like emergency_stop.py. Make sure to make it executable and put it inside a scripts directory in your in_class_day03 ROS package.
Using the Laser Range Finder
The next sensory-motor loop I suggest that you create should be called distance_emergency_stop.py. This node should be identical to emergency_stop.py except it should use the laser range finder to detect when an obstacle is within a specified distance and stop if this is the case. It is up to you how you implement this. You can either use just the measurements in front of the robot, or perhaps use all of the measurements. You may want to use an all-or-nothing control strategy (also called bang-bang) where you are either going ahead at some fixed speed or you stop completely. Alternatively, you may use something akin to proportional control where your speed slows proportionally with how close you are to the target distance. Again, for more detail on using the Neato sensors (including the laser range finder), see the